Greetings Me Droogs N Droogettes!
Thank goodness for .xml files. I was able to pull the Flammenwerfer original poasts and save them to Word Documents, which I’m reproducing here.
Now, with the understanding that prices have gone pretty much insane since 2019 when I did the original project, expect MOAR Fiatbux to be spent on the whole kit and kaboodle.
Also, this’s the Mark One, Mod Zero Flammenwerfer.
There have been Modifications that’ve been done to improve the build and ease of things. I’ll include details on that after the fact. But, Poast One, Page One:
DISCLAIMER
THIS IS STRICTLY FOR LAUGHS AND EDUCATIONAL PURPOSES ONLY. REAL SMART PEOPLE –DO NOT– BUILD HOME MADE FLAME THROWERS.
PROCEED AT YOUR OWN RISK, THE WEBMASTER AND THE CHAIRMAN DISAVAOW ANYTHING STUPID YOU MAY DO.
DO NOT RUN WITH SCISSOR, NOR TAUNT HAPPY FUN BALL
YMMV
“In the United States, private ownership of flamethrower is not restricted by federal law. Flamethrowers are legal in 48 states and restricted in California and Maryland.”
Yep. Legal. Suck it Fuzzballs.
It dawned on me just -why- they’re so terrified.
(insert music and deep voice) Since the Dawn of Time, fewer things have terrified man, and proto-man more than burning to death. (end music) Horrible way to go really. And here the fuzz were in a stand off with an at the time mentally unbalanced dude with the ability to roast them alive. As you can see, the ‘throw’ on it was about 40-50 feet, but thats because I was running pure 87 octane which burned off w/out sticking… if I had been running Napalm, the throw goes out to 80-100 feet…
In CQB thats good enough to count along with Horseshoes, Hand Grenades, Nukes, and Bad Analogies.
Kevlar doesn’t do shit. In fact, Kevlar is a ‘no-no’ as it melts and adheres to the skin. If I had decided (not that I could) to go Full Retard, the night might have made international news, never mind national or local. Thankfully it didn’t happen.
But in the interest of these now Screaming Socialists and Retardigans running for the Orifice of the Criminal In Chief, I thought it was my public duty to inform my readership as to the alternatives to an AR-15. Home defense has never been so much fun, but be aware it’s as dangerous to the user, and I -highly- recommend that the novice NOT fuck around.
LEGAL DISCLAIMER: Do NOT try this at Home. Do NOT build a flame thrower if you are a fucking moron with delusions of being a handyman. Do not use to dry pets. The author is strictly relaying humorous and theoretical anecdotes so please don’t blame me if you F.A.F.O. DO NOT BUILD IF IN THE STATE OF MARYLAND OR CALIFORNIA. Them fuckers got no sense of humor.
That being said and out of the way? as I said.
Legal.
Scares the FUCK out of Coparoaches.
Did I mention easy as fuck to build if yer not a complete fucking idiot?
And cheap? I got ALL the parts on Amazon with Prime shipping for less than $350. (This now being Modified by X2)
Red Flag Laws you say? Flammenwerfer I say. F.A.F.O. Mister “I’m here to arrest you because you didn’t follow the law!”
Thats rich.
Confiscation?
Bring it.
Now, onto Page Two:
These are all the pieces-parts I used to make the Flammenwerfer Mark One Mod Zero. The Link will take you to the part (if they aren’t dead) and Yes, I do get a taste of the vig as it took quite a while to put this all together.
Said Parts List:
20 lb CO2 Tank https://amzn.to/2muHXH0
Now a note on the tank. You can get a 10 pound Tank Like I made for one of the readers here. He wanted lighter, and was willing to sacrifice burn time/ammo for maneuverability. Also, a 15 or 10 pound tank costs less. Jes’ Sayin’
1/8” Male NPT To 1/8” Male NPT X 4.5” Length https://amzn.to/2kQ656A
1/8” Male NPT To 1/8” Male NPT X 3” Length https://amzn.to/2ncG5mN
320 cga Female To 1/8″ Female NPT https://amzn.to/2lpsuYE
Paintball Universal Fill Adapter https://amzn.to/2mWhXVs
24oz CO2 Tank (I recommend having 2… quicker refill to ensure you empty out the main tank.) https://amzn.to/2moGdzl
Male Quick Disconnect x 3/8” Male NPT https://amzn.to/2mPuxpg
Female Quick Disconnect x 3/8” Male NPT https://amzn.to/2mXkvTe
Female Quick Disconnect x 3/8” Female NPT https://amzn.to/2kNQODg
High Pressure Hose 3’ https://amzn.to/2kQddzS
Blue Hawk Pressure Washer Gun https://amzn.to/2mrzQLD
M22 Male x 1/4” Female NPT https://amzn.to/2mpaEp2
1/4” Male NPT x 1/8” Female NPT Reducer https://amzn.to/2kRvigX
Red Brass Seamless Pipe Fitting, Nipple, Schedule 80, 1/8″ NPT Male X 3″ Length https://amzn.to/2kSl6VD
Anderson Metals Brass Pipe Fitting, Coupling, 1/8″ x 1/8″ Female Pipe https://amzn.to/2lrNJsP
Erie Tools Pressure Washer Twist Connect M22 X 3/8″ Quick Disconnect Plug 4500PSI Hig Pressure Brass Fitting 300° F Max Temp https://amzn.to/2lpJq1j
Bernzomatic TS4000 Trigger Start Torch https://amzn.to/2lsdnh7
Quick Disconnect Hose Clamps https://amzn.to/2lhikcP
16.4 oz Propane Cylinder (I buy mine at Lowes or Home Depot)
ALICE Pack frame w/Shoulder straps and kidney pad https://amzn.to/2lgkFEU
ALICE Pack frame Cargo Support Shelf https://amzn.to/2lsjiCR
Cambuckle Cargo Straps, no hooks (for securing the tank to the frame) https://amzn.to/2mXZlV3
I -think- that rounds up the pieces parts.
Next is the Tools.
The list with the links attached are NOT the common stuff a dood or doodette might have laying about in “Ye Olde Toolboxe” So I linked them for convenience. The stuff w/out links -should- be in yer basic home/car repair kit, and if not, then shame on you.
1/2” Dewalt Pilot-Point Drill Bit https://amzn.to/2lLNl8H
37/64” Drill Bit https://amzn.to/2lM6oQh (This is a MUST HAVE… it’s what bores the hole in the tank)
3/8″-18 NPT Thread Tap https://amzn.to/2l7nw2D
7/32” Dewalt Pilot-Point Drill Bit https://amzn.to/2nf7OTP
Thread Tap 1/4”-28 NF https://amzn.to/2n9Tzj5
Teflon Tape Yellow https://amzn.to/2n9LJ98
The Rest Y’all should have if you’ve got a basic toolbox.
1” Wrench
7/8” wrench
¾” Wrench
½” Drive socket Wrench
3/8” Drive socket Wrench
3/8” Drive 8” Extension Bar
11/16” Deep Socket ½” Drive
15mm Deep Socket 3/8” Drive
9/16” 8-Point Socket ½” Drive
5/8” Socket ½” Drive
½” Socket 3/8” Drive
Pliers, Needle Nose
Center Punch
2mm Allen Wrench
Cutting Oil
Flathead Screwdriver
Damn… Lot of ‘stuff’…
No wonder I’ve been a lazy bastard and keep putting this off.
ASSEMBLY TIME
For the sake of clarity, Parts will be in BOLD BLACK
Tools will be shown in BOLD ITALIC
So Step One:
I started off by doing accountability of ALL the parts. Once I had them together, I literally started from the top down. First thing, Take the Main tank, the 20LB Large Tank, and using the 1 ¼ INCH WRENCH remove the Tank Fill Valve. Depending on which model you bought, there may be a spinning black plastic guard. This does NOT need to be removed. In fact, I suggest leaving it on there to assist in protecting the Tank Fill Valve.
Step Two:
Using the Yellow Teflon Tape, wrap the threads of the Tank Fill Valve on the upper part of the valve. DO NOT WRAP THE BASE OF THE VALVE. This’s because it’ll make it impossible to remove it from the tank when you are trying to refill the Main Tank..
Gather the following parts:
1/8” Male NPT To 1/8” Male NPT X 4.5” Length https://amzn2kQ656A.to/
1/8” Male NPT To 1/8” Male NPT X 3” Length https://amzn.to/2ncG5mN
1/4” Male NPT x 1/8” Female NPT Reducer https://amzn.to/2kRvigX
Female Quick Disconnect x 3/8” Male NPT https://amzn.to/2mXkvTe
Male Quick Disconnect x 3/8” Male NPT https://amzn.to/2mPuxpg
And do the same. Wrap all of the threaded sections of the gathered parts with between 2 ½ to 3 turns on the threads. Make sure its neat and tight and that you cut it away -cleanly-. Put these aside for now, but have them ready for:
Step Three:
Parts Needed:
320 cga Female To 1/8″ Female NPT https://amzn.to/2lpsuYE
This is made up of 3 individual sub-parts including a Large Brass Nut, a Small Brass Nut, and a Plastic White Washer
From the set aside parts, get the 1/8” Male NPT To 1/8” Male NPT X 4.5” Length https://amzn2kQ656A.to/
Paintball Universal Fill Adapter https://amzn.to/2mWhXVs
Take the small brass nut from the 320 cga female to 1/8″ female NPT and thread it onto the 1/8” male NPT to 1/8” male NPT x 4.5” length Tighten as much as you can by hand.

Take this assembly, and insert the tube into the Large Brass Nut like so:

Once you have this ready, the Large Brass Nut should be hanging relatively loose. Get The Universal Paint Ball Fill Adapter, and insert the other end of the 1/8” male NPT to 1/8” male NPT x 4.5” length
Into the 1/8th hole in the side of the Fill Adapter. Once its hand tight, get the 11/16” Deep Socket ½” Drive and the 1/2inch drive socket. Slide the Large Brass Nut off of the Small Brass Nut and insert the Small Brass Nut into the 11/16” Deep Socket ½” Drive and -FIRMLY- crank the 1/8” male all the way into the Paint Ball Fill Adapter. Make sure its nice n’ tight, as this is a potential leak area where the propellant gasses are going to be feeding the Flammenwerfer. Once its good, slide the small nutback into the Large nut, insert the Plastic White Washer into the Large Bass Nut to secure the small nut inside. Click it in place so the tube is locked in place.

Once this’s completed, you should have an assembly that looks like this:
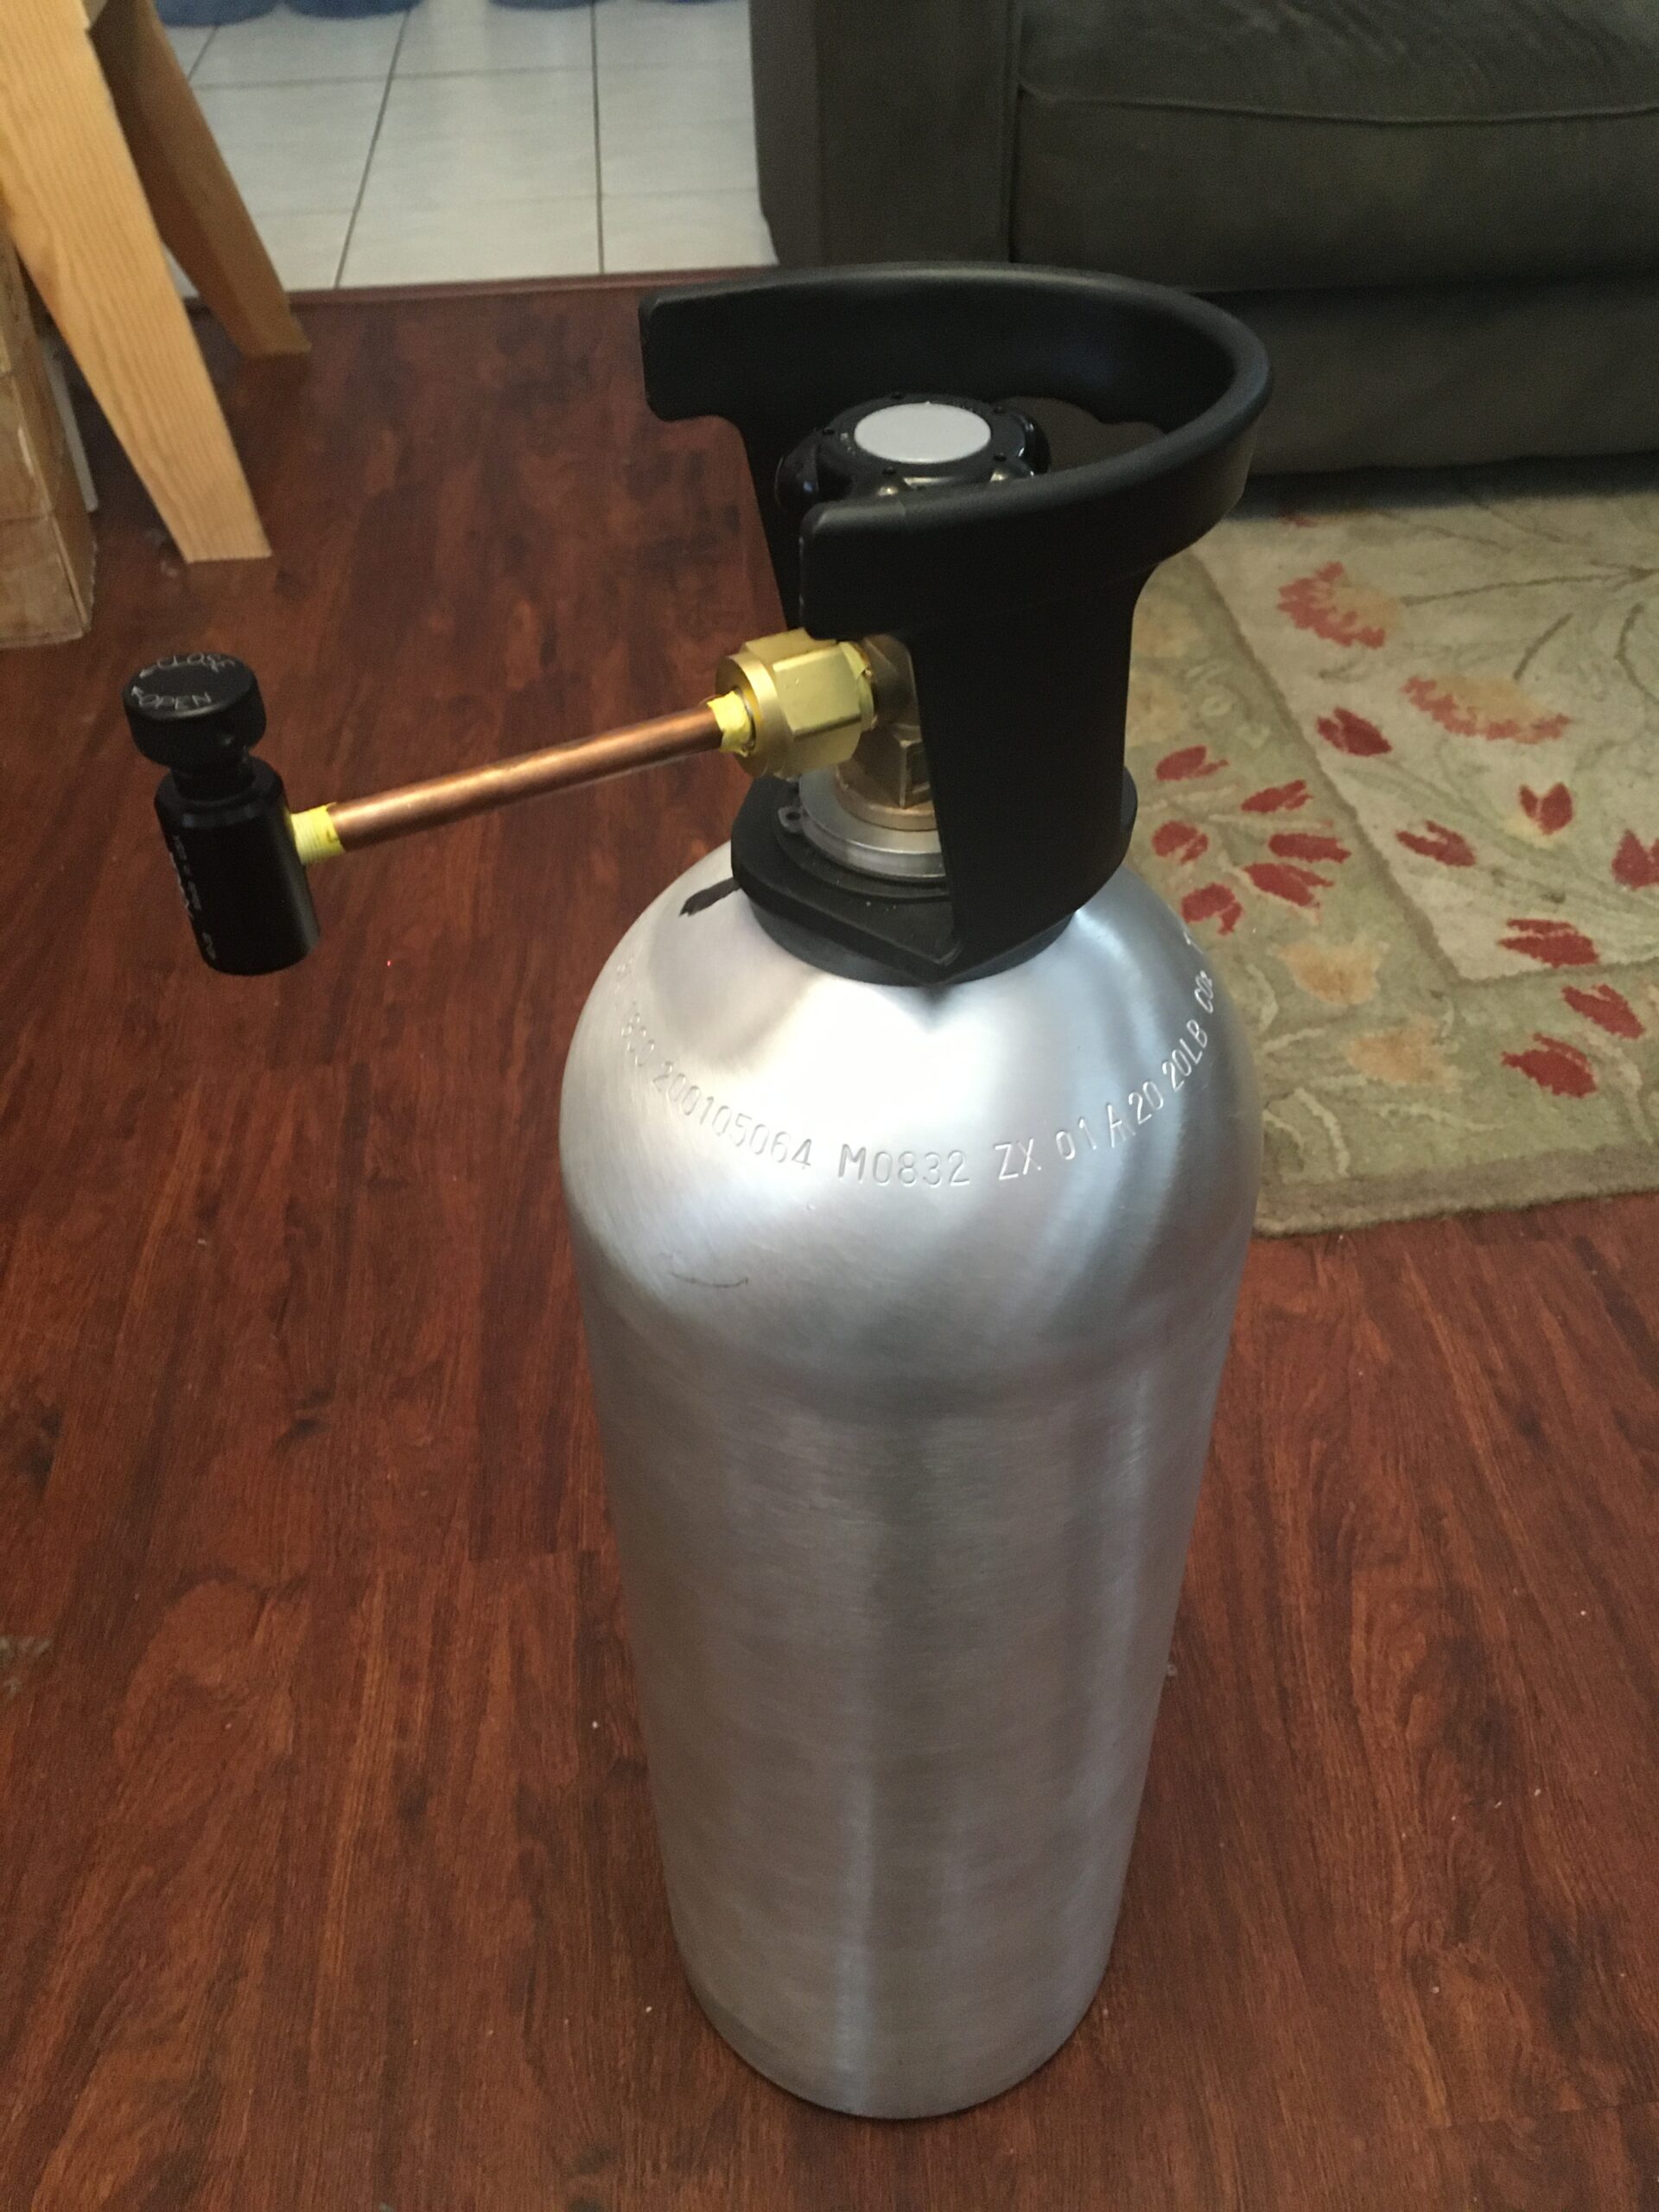
The next step is a Pressure test. I suggest doing this first so that you know you ain’t got no leaks. Especially before you start drilling on the tank itself, because once that’s done, chasing itty-bitty air leaks is a stone bitch (as I found out the hard way.)
Step Four: Air Pressure Assembly Test
Reassemble the Tank Fill Valve onto the tank. Be careful re-threading it on the tank. The tank is aluminum, and if you cross thread it, say goodbye to about $100. Once you have it on, (being careful of the plastic guard, give the Fill Valve a slightly more-than-hand-tight spin. You -don’t- want to crank down on it. Just enough for the rubber gasket to fully engage.
What You DO need to get ready is the 1-1/8” wrench. You’ll be utilizing this on the Large Brass Nut to crank the assembly nice n’tight. The Universal Filler Valve needs to be vertical with it’s valve on top.
Once thats locked in and EVERYTHING is tight, grab a 24oz CO2 Tank https://amzn.to/2moGdzl
And take it down to the local paintball store to get it filled. Should be about 5 bux to get it filled. This’s why I like to have a few extra (2X for a total of 3) on hand. Once it’s filled, bring it home and get s dish with some soapy water for a leak test. 2:1 ratio dawn detergent so it’ll blow nice bubbles if/when it leaks. Install it into the Universal Filler Valve. Make sure that you have both valve(s)closed BEFORE you install the CO2 tank.
Insert the CO2 tank into the Universal Filler Valve first. Look and listen to see if it is holding pressure. If so, Open the Valve. Watch the seams on the junction points. Dribble some soapy water on it. Observe. No bubbles = good. Open the Main Tank Valve. You should hear the tank fill with CO2 and become pressurized. Be VERY CAREFUL while doing this. I recommend Eye Protection and leather gloves in case -something- ruptures.

If there are no apparent leaks, Turn off the Valves in reverse order. Remove the CO2 Tank SLOWLY. Bleed off the CO2 CAREFULLY EVERY STEP OF THE WAY. Fuck around, and you’ll find out the hard way.
Now, We’re gonna tackle the main Tank Prep, as in Prepping, drilling and tapping, then installing the bayonet valve that the hose will be attached to. For this evolution, You’ll need the following part:
20 lb CO2 Tank https://amzn.to/2muHXH0
And the Tools to use:
Drill press with 1/2” chuck -or- (b) Power drill with 1/2″ chuck
1/2” drive socket wrench
9/16” 8-point socket 1/2” drive
1/2” Dewalt pilot-point drill bit
37/64” Drill bit
3/8″-18 NPT thread tap
Cutting oil
Setup is as Follows. At this point you’ve reattached the newly built Universal Filler Valve and tightened it down when performing your pressure/overpressure test. With it set in the drill press (or workbench) measure out 90 degrees on either the left side or right side.
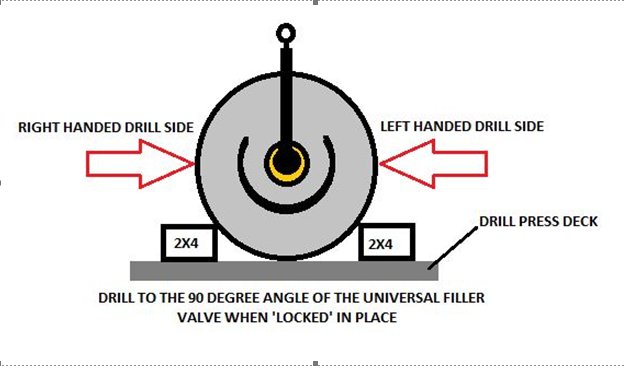
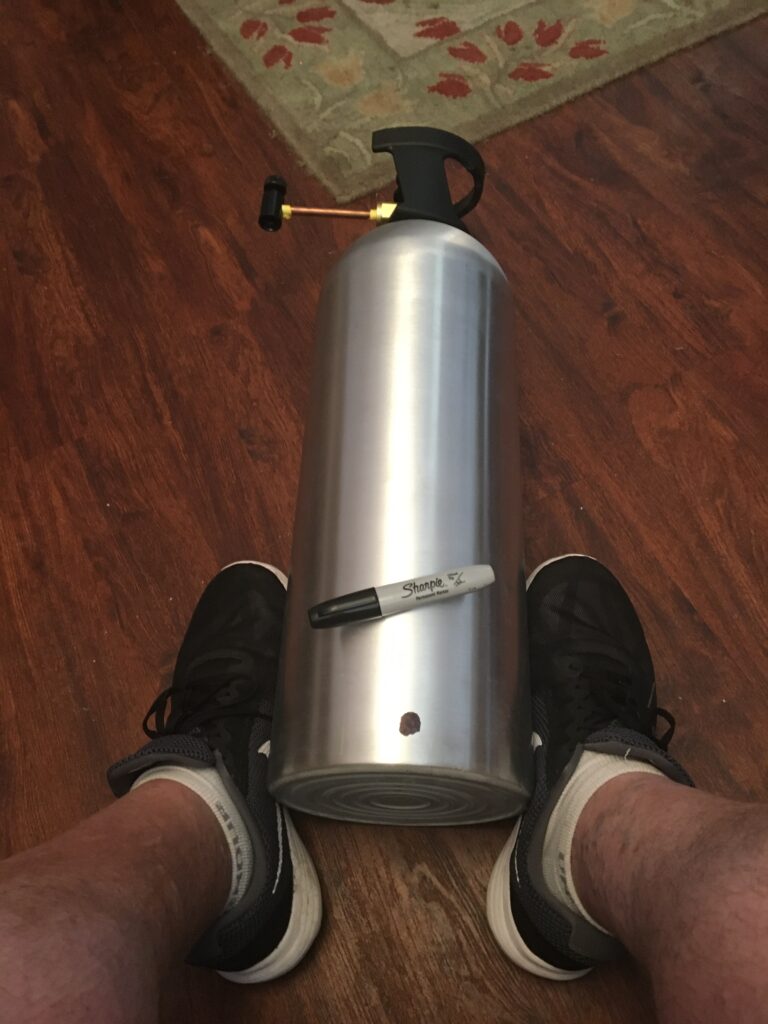
Because the hose that feeds the fuel to the nozzle is only 3-4 foot long (I used a 3 foot hose) you need to insure that you cut in on the correct side of the tank. If yer a righty, cut on the right side. If’n yer a southpaw, cut left. Once you unfuck yerself on the whole left/right thing, just realize that the pressure container, the 24oz CO2 Tank https://amzn.to/2moGdzl is going to be centered on the back of the tank on your frame.
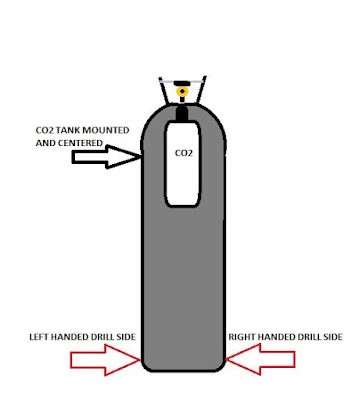
Once you have the side picked out, Remove the Universal Tank Filler / Pressurization System. Mark the side you want to use roughly one inch from the bottom. Once you have the tank stripped down, roll it 90 degrees up to the side you wish to drill. Measure ONE INCH from the base of the 20 lb CO2 Tank and https://amzn.to/2muHXH0 and then prep to drill.
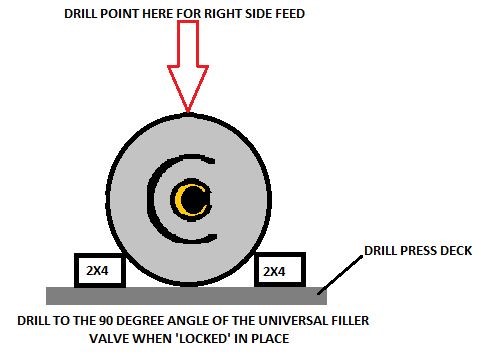
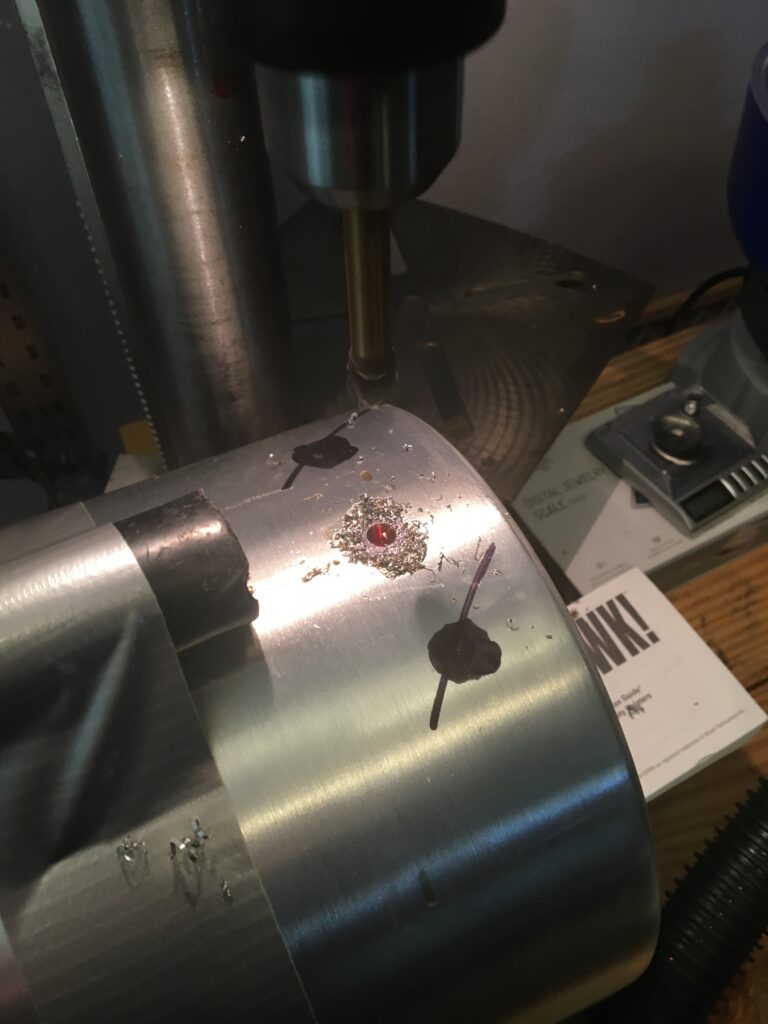
Make sure the tank is secure. Squirt a lil cuttin’ oil on the spot your going to drill. Using the 1/2” Dewalt pilot-point drill bit, begin cutting into the tank -SLOWLY AND CAREFULLY-. You’ll be getting a huge amount of shavings and keep adding the cutting oil as needed. Take your time and do it in stages is my approach.
This is your starting hole. Once it’s cleanly punched through, change out to the larger finishing bit, the 37/64” Drill bit. Add more cutting oil, and cleanly cut out the remaining metal, expanding the hole to 37/64ths.
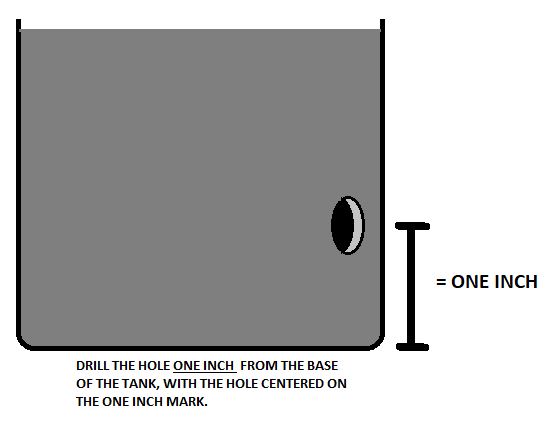
OK. So now you got the hole. Take the square side of the 3/8″-18 NPT thread tap into the 9/16” 8-point socket 1/2” drive and insert the threaded side of the 3/8″-18 NPT thread tap into the 37/64” hole. Begin cutting the threads by turning the 3/8″-18 NPT thread tap clockwise ensuring that the 3/8″-18 NPT thread tap is perpendicular to the surface of the large tank.
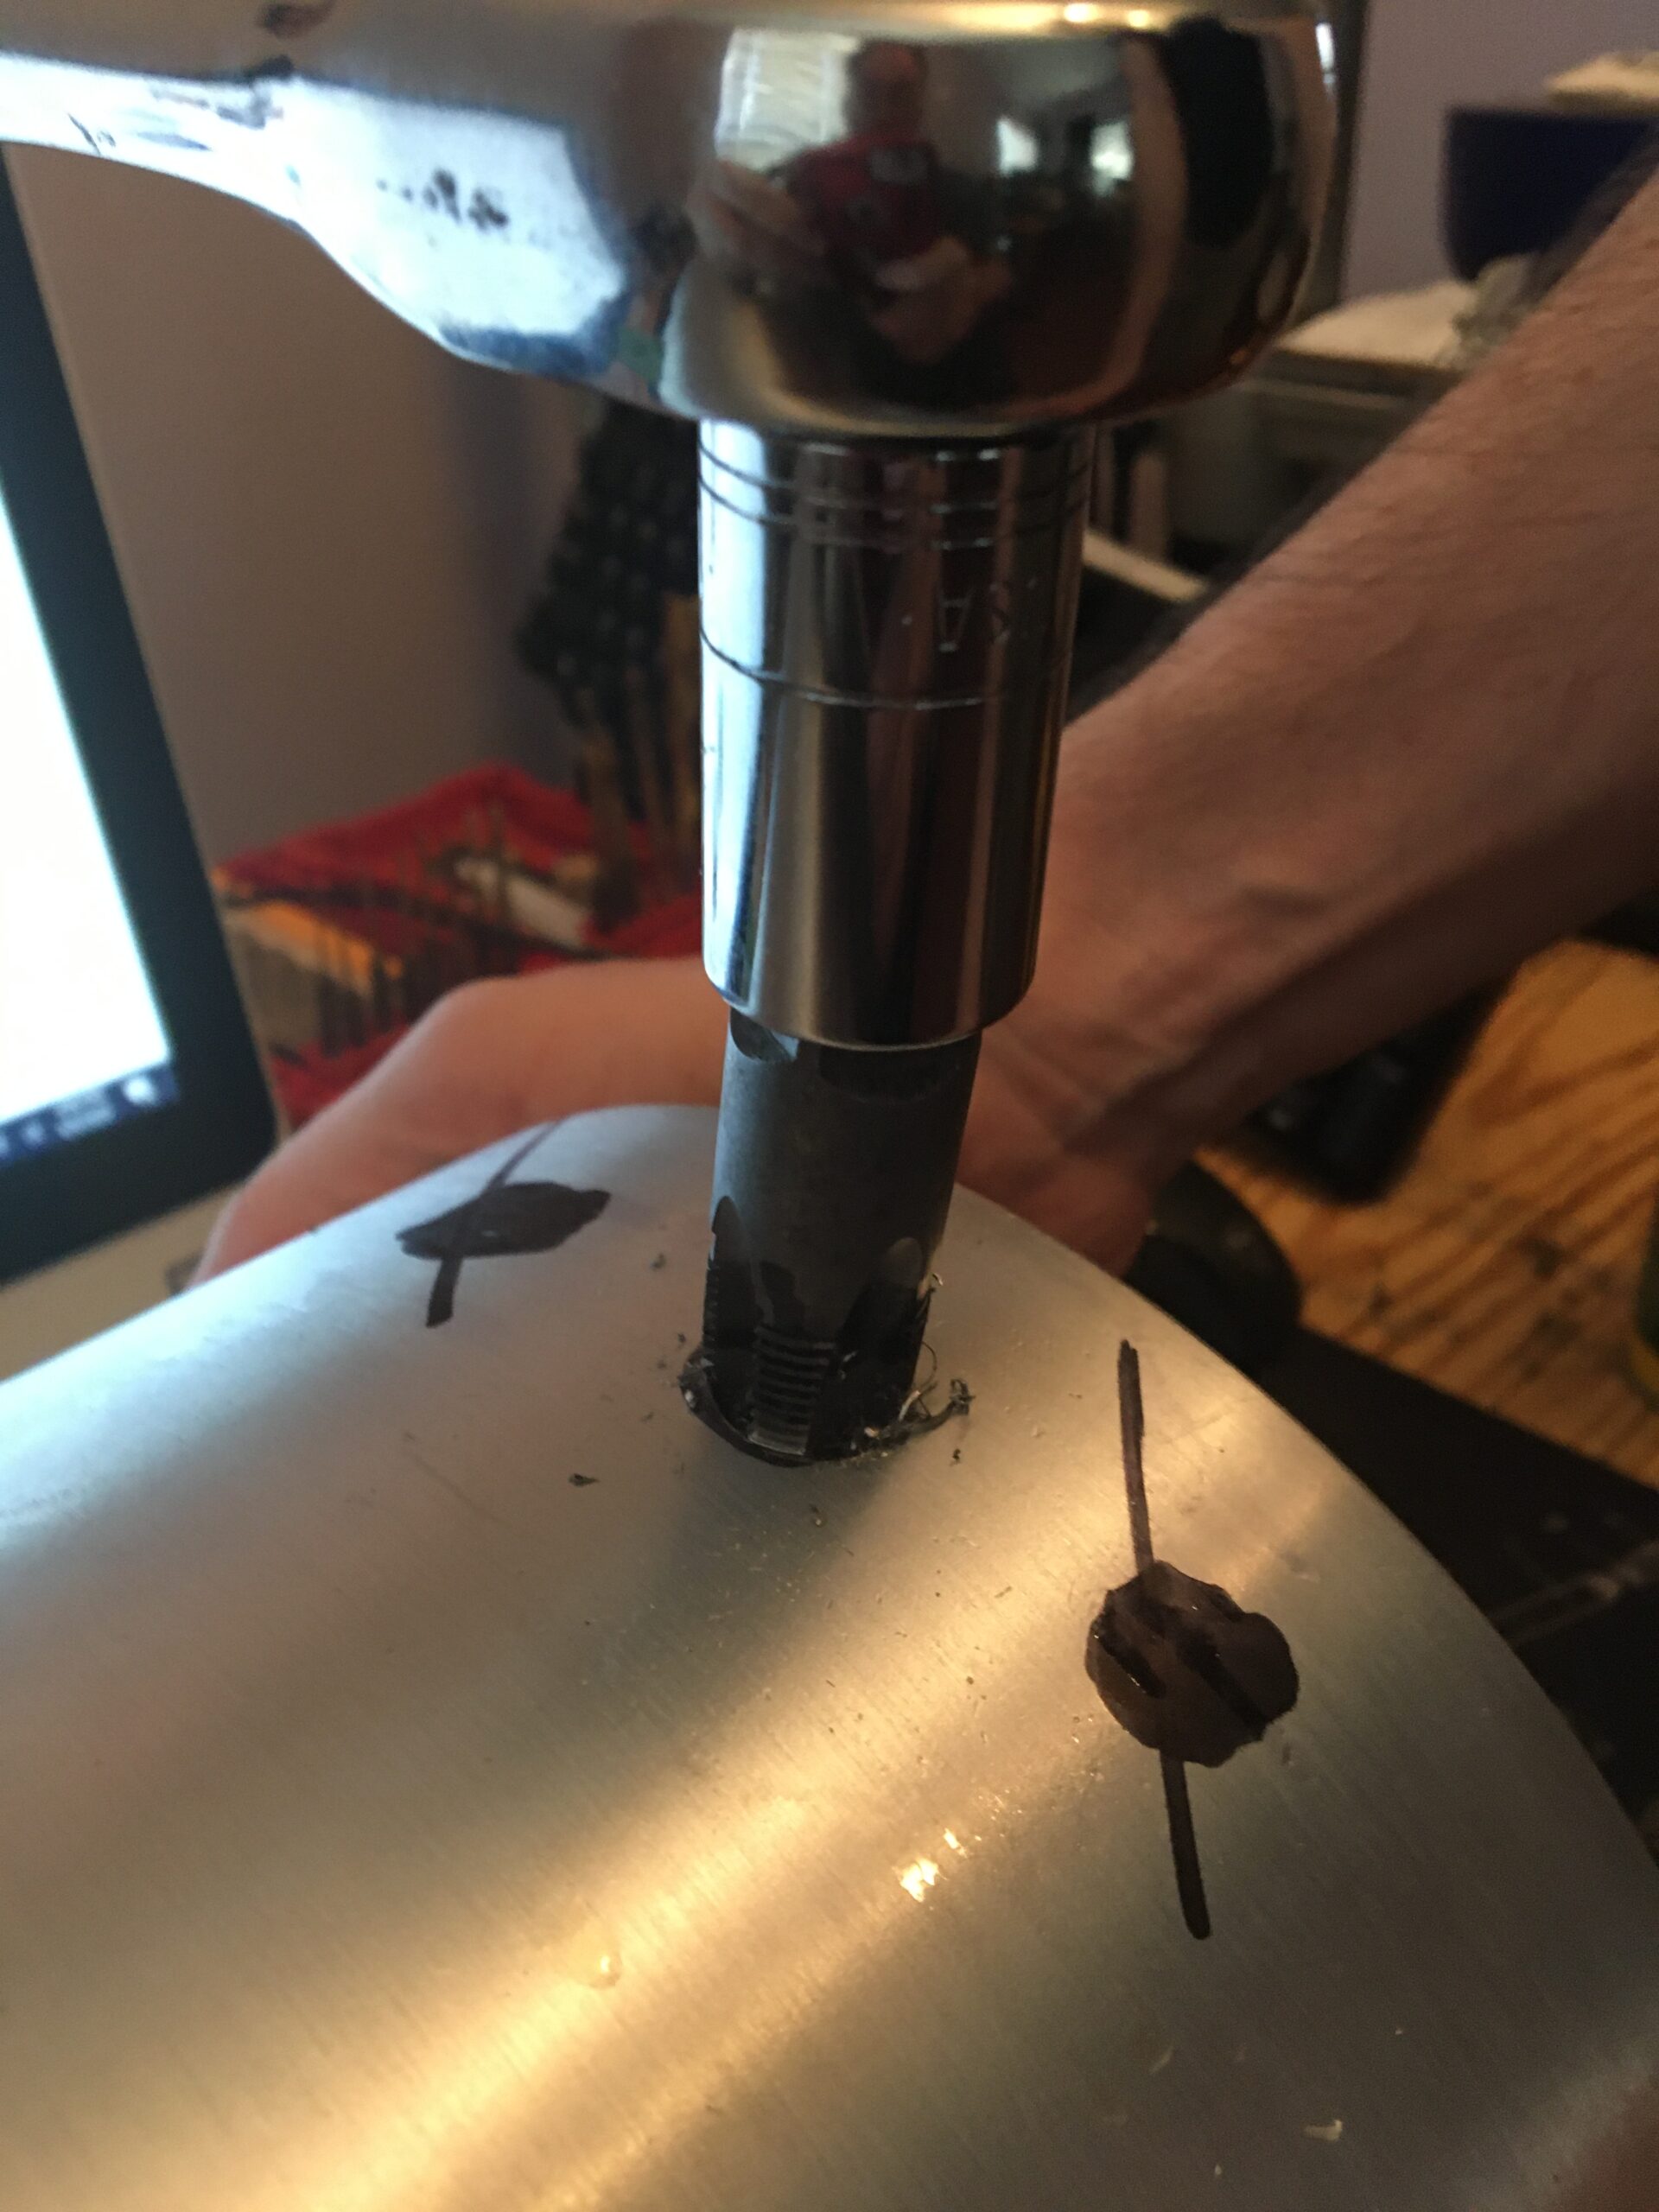
There is NO SUCH THING AS BEING TOO CAREFUL OR SLOW! Make sure you cut slowly, adding cutting oil regularly so’s the thread cutter doesn’t get bonded or stuck to the metal. Continue cutting until only 6-7 threads of the 3/8″-18 NPT thread tap are exposed above the surface of the large tank. This -should- complete this evolution.
Step Two: Rinse out the tank.
Now that you’ve drilled and tapped the tank, you HAVE to make sure you get ALL of the little fiddly bits of shavings and metal out of the tank. Very carefully so as to not to damage the threads, use an old toothbrush or gun cleaning toothbrush to remove any clinging bits of aluminum around the tap hole. Blow out / shake out all remaining bit. Me? I triple rinsed with water, shaking the shit out of the tank to make sure it was clean. One itty-bit of metal in there when yer doing ‘flame on’ can cause BIG “Fiery-Ball-O’Death” Issues. Big Safety Tip: Thoroughly clean the tank.
Step Three: Install the feeder nipple.
Parts Needed:
Male Quick Disconnect x 3/8” Male NPT https://amzn.to/2mPuxpg
20 lb CO2 Tank https://amzn.to/2muHXH0 (Now with hole drilled and tapped)
Yellow Teflon Tape
Tools Needed:
1/2” drive socket wrench
11/16” deep socket 1/2” drive
Take the Male Quick Disconnect x 3/8” Male NPT and wrap two to 2.5 times around the threads. Mate up the threads to the 37/64” hole and thread it in. Once you have it cleanly started, finish securing it completely to the tank using the socket wrench and 11/16 drive.

Annnnnnd more to go… we’re almost completed on the hard stuff… the rest is pretty easy. Lotsa pressure checks and a bit more modifications to the pressure washer wand, but for the most part, some of y’all cool kids make be able to figure out the rest….
and one last time for the slow kids in the back:
DISCLAIMER:
I AIN’T RESPONSIBLE FOR SHIT.
I KNOW NUTHIN’ I HEAR NUTHIN’ AND I SEE NUTHIN’.
THIS’S STRICTLY FOR ENTERTAINMENT PURPOSES
AND IF YOU ARE CRAZY ENOUGH
TO FOLLOW THE BOUNCING BALL, ITS -ALL- ON YOU.
Now: Part 4 of this is going to be the Hose and Gun Build.
Parts Needed:
Female Quick Disconnect x 3/8” Male NPT https://amzn.to/2mXkvTe
Female Quick Disconnect x 3/8” Female NPT https://amzn.to/2kNQODg
High Pressure Hose 3’ https://amzn.to/2kQddzS
Teflon Tape Yellow https://amzn.to/2n9LJ98
Tools Needed:
1” Wrench
7/8” Wrench
¾” Wrench
Simple really. Wrap all the parts with the Yellow Teflon Tape. It’s really important to use the yellow as it’s resistant to petroleum based stuff like, oh Napalm and gas… using -regular- Teflon tape and yer hosed (pardon the pun.)
You’ll want to connect the hose(s) to the fittings hand tight at first, then crank them down with the wrenches thusly:
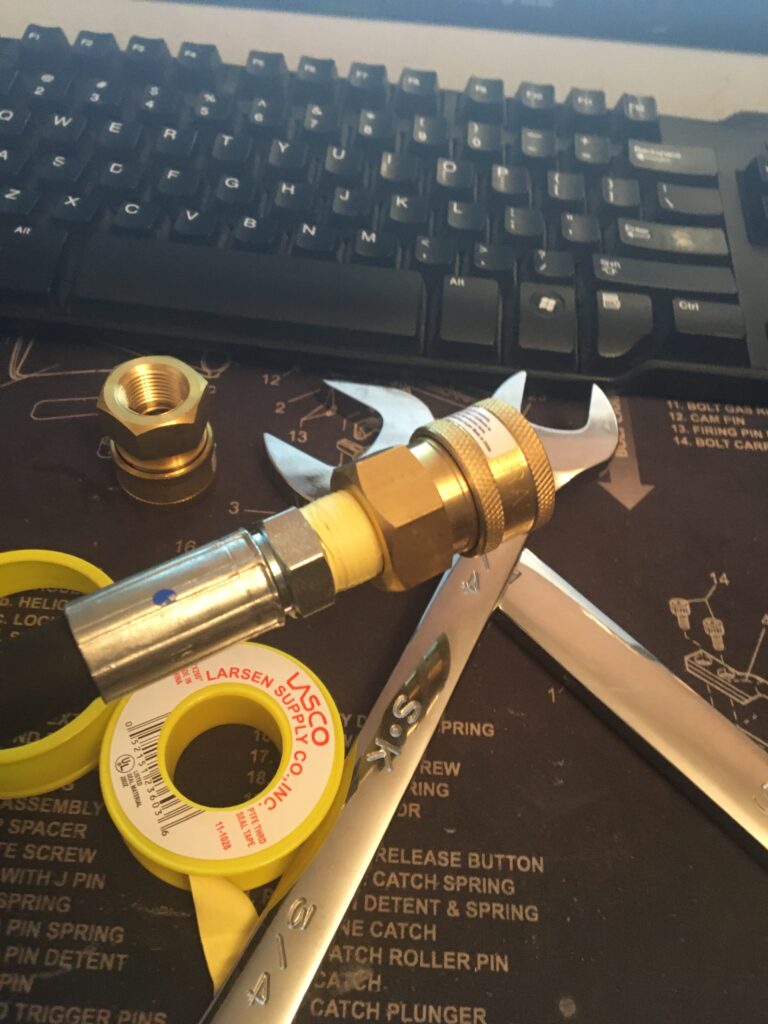

Scissoring them nice n’ tight. You do NOT want any leaks in the hose area. Things could get HOT muy malo.
OK… once thats done, you can connect the hose to your previously built tank and see if it fits. The quick releases are the bomb so to speak b/c it allows you to clear each section IF and only IF you have a clog or something goes pear-shaped during the running of this.
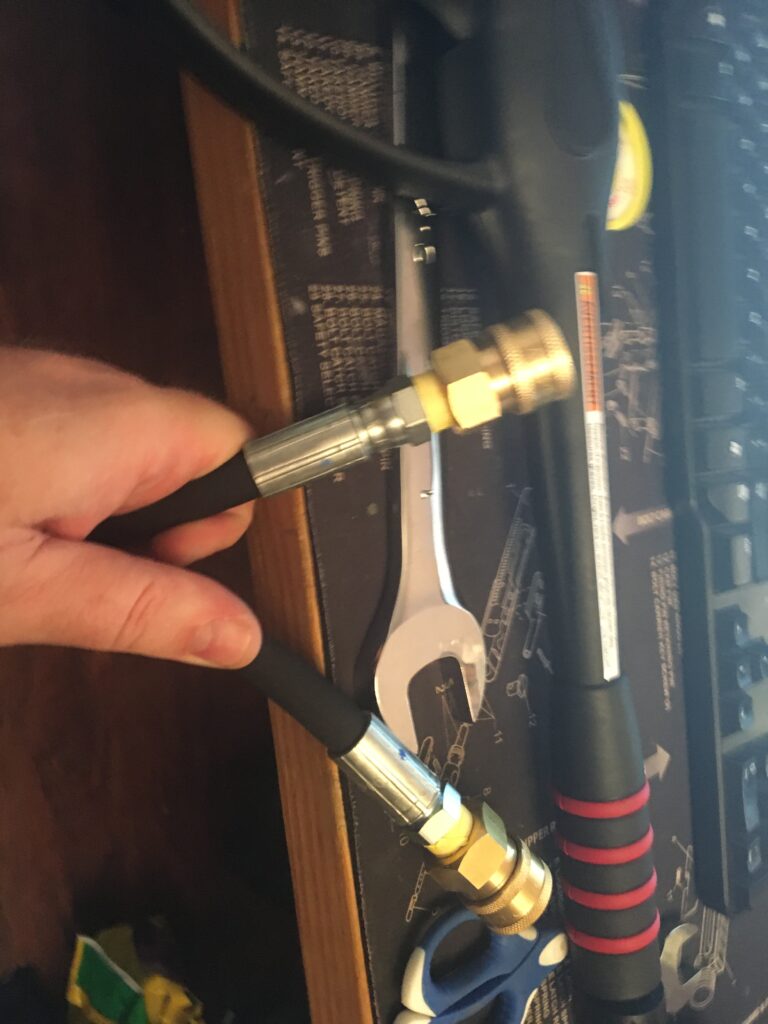
Onward now to the Gun Itself: For this
Parts Needed:
Blue Hawk Pressure Washer Gun https://amzn.to/2mrzQLD
M22 Male x 1/4” Female NPT https://amzn.to/2mpaEp2
1/4” Male NPT x 1/8” Female NPT Reducer https://amzn.to/2kRvigX
Red Brass Seamless Pipe Fitting, Nipple, Schedule 80, 1/8″ NPT Male X 3″ Length https://amzn.to/2kSl6VD
2X Anderson Metals Brass Pipe Fitting, Coupling, 1/8″ x 1/8″ Female Pipe https://amzn.to/2lrNJsP
Erie Tools Pressure Washer Twist Connect M22 X 3/8″ Quick Disconnect Plug 4500PSI Hig Pressure Brass Fitting 300° F Max Temp https://amzn.to/2lpJq1j
Bernzomatic TS4000 Trigger Start Torch https://amzn.to/2lsdnh7
Quick Disconnect Hose Clamps https://amzn.to/2lhikcP
16.4 oz Propane Cylinder (I buy mine at Lowes or Home Depot)
Tools Needed:
½” Drive socket Wrench
3/8” Drive socket Wrench
5/8” Socket ½” Drive
½” Socket 3/8” Drive
7/8 Wrench
OK Starting with the Red Brass Seamless Pipe Fitting, Nipple, Schedule 80, 1/8″ NPT Male X 3″ Length https://amzn.to/2kSl6VD, Tape all the threads again: (Small hint: do this to ALL THE THREADED PIECES PARTS. It’s a given that like -everything- on this puppy needs to be neatly sealed.) Once it’s ready, take the 2X Anderson Metals Brass Pipe Fitting, Coupling, 1/8″ x 1/8″ Female Pipe https://amzn.to/2lrNJsPand mount them on the pipe you just wrapped (heh… that sounds obscene…) Use the two socket drives thusly to insure again a -tight- fit:
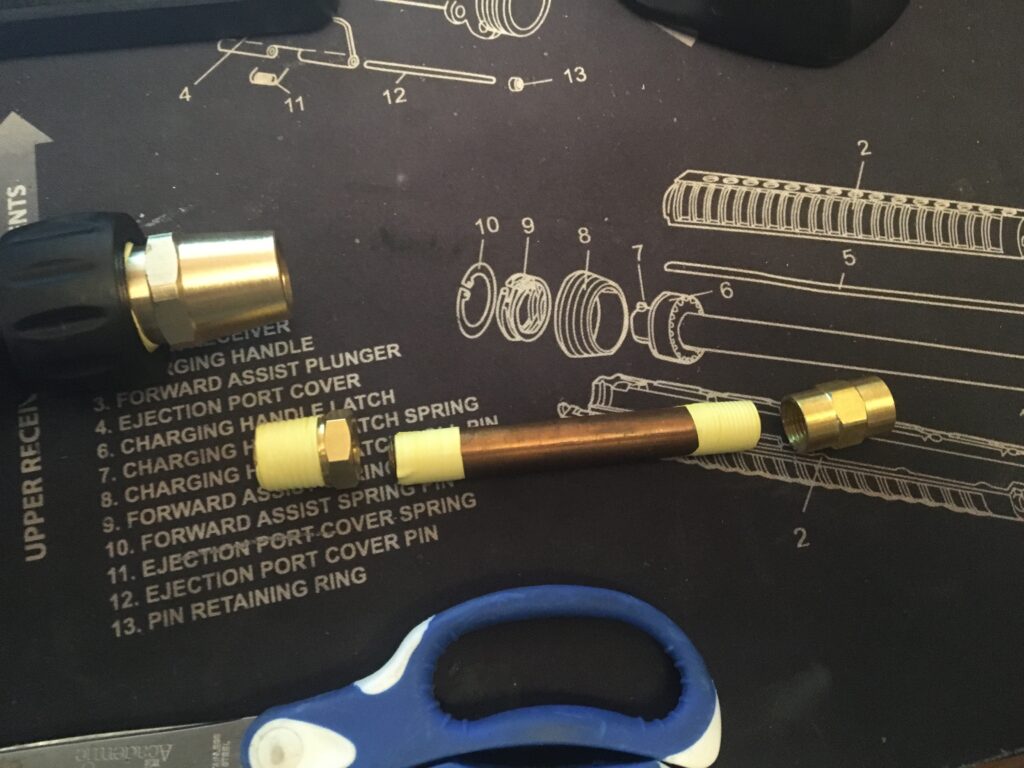

Then take the M22 Male x 1/4” Female NPT https://amzn.to/2mpaEp2and crank THAT on. Once you have that installed, attach it to the front of the sprayer. You now have the gun completed ALMOST. The only thing left is to attach the Erie Tools Pressure Washer Twist Connect M22 X 3/8″ Quick Disconnect Plug 4500PSI High Pressure Brass Fitting 300° F Max Temp https://amzn.to/2lpJq1j to the end of the feed assembly.
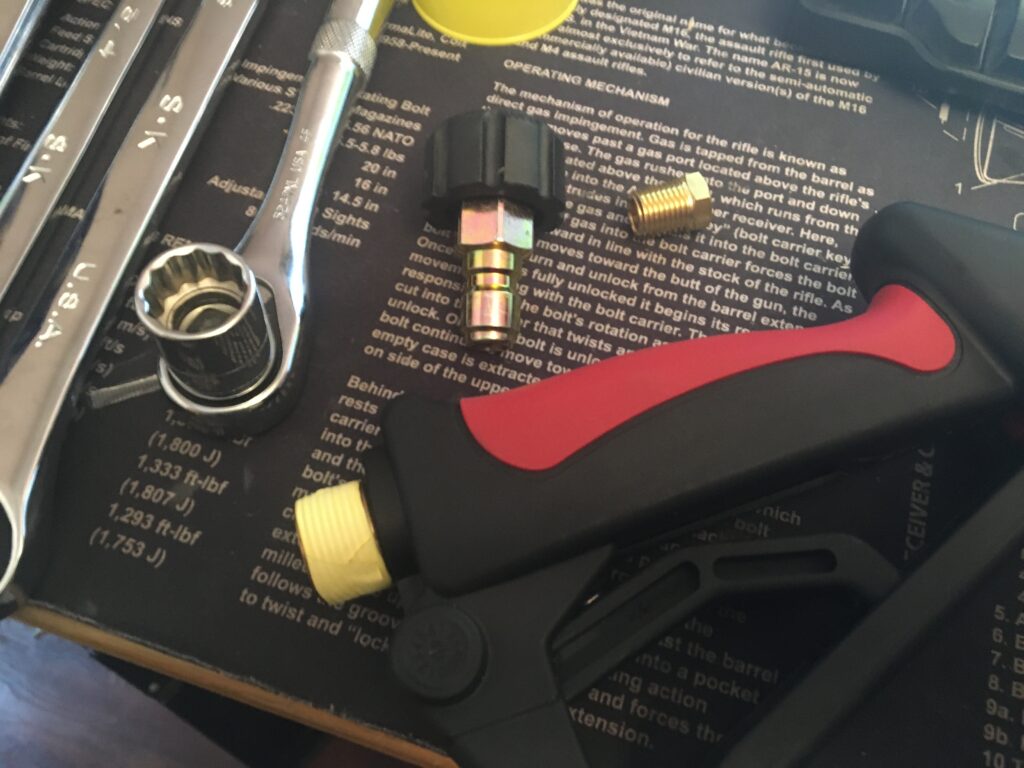
Once this is done, you should be able to do a pressure test once you’ve connected the hoses to the tank and gun respectively. Give it a shot so to speak.
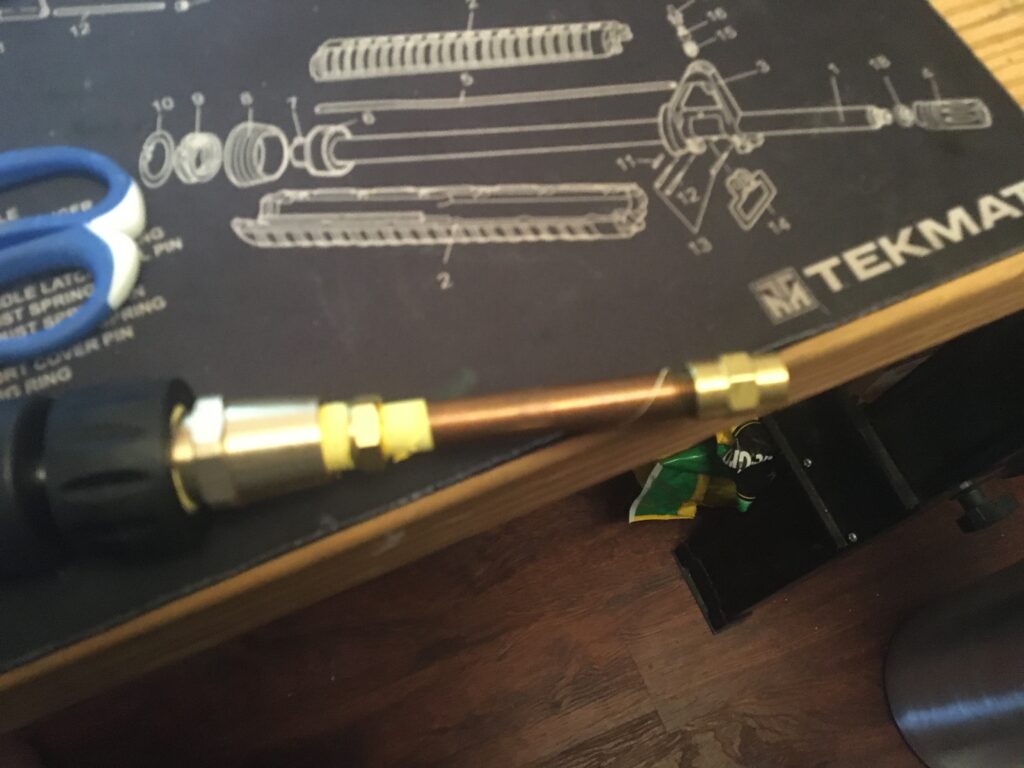
And it should look roughly like this:
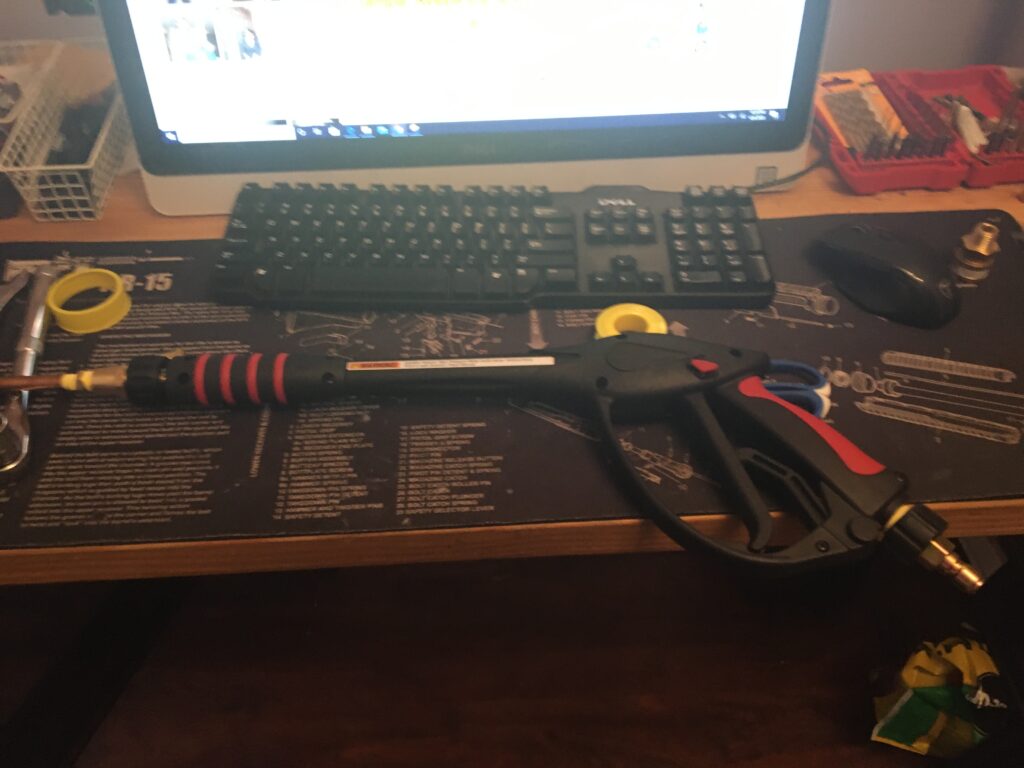
Which then needs to have the propane tank slung underneath. For this I used some shims to stabilize it, and used the aforementioned Hose Clamps to strap it on. Adjustments will vary person-to-person. For that matter, it’s pretty much at this point complete.
Whew…
So there you have it.
“How to build your own Flammenwerfer”
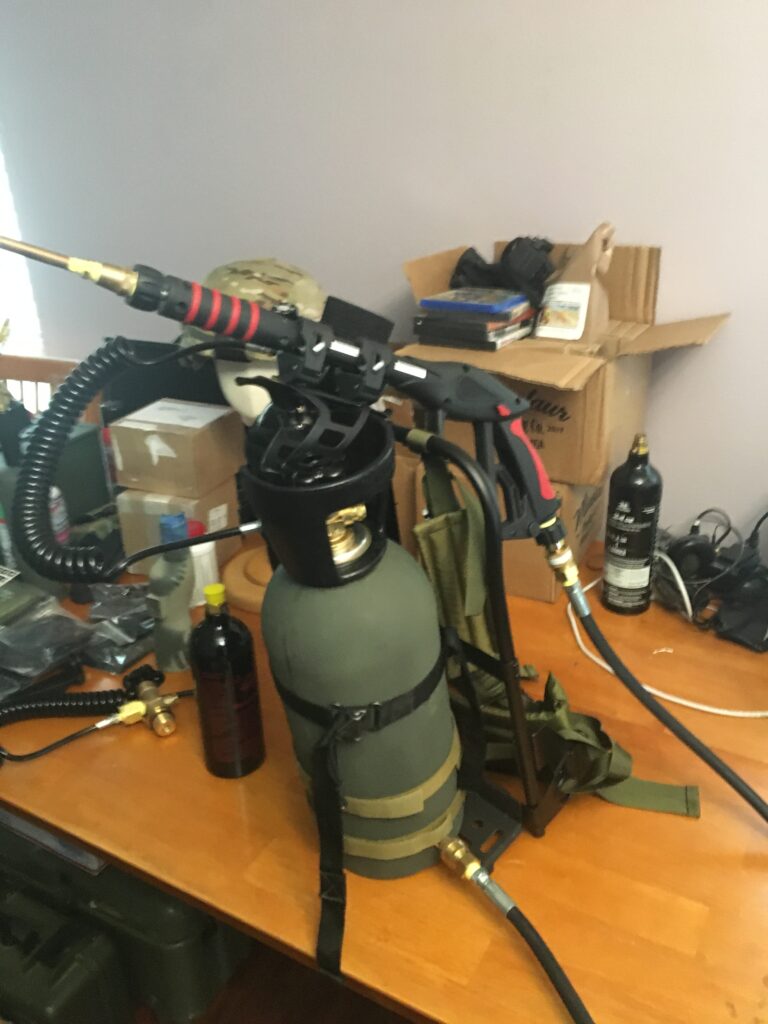
That right there is the mini I made for a customer. I also modified the air feeder from the brass to a 10 foot coiled hose (you see above) which alleviated the stiffness of the brass and the C02 tank ‘hanging’ off the feed. Too much tension IMO, so with the coiled hose, I was able to put the C02 bottle into a pouch, and hang it on the frame:
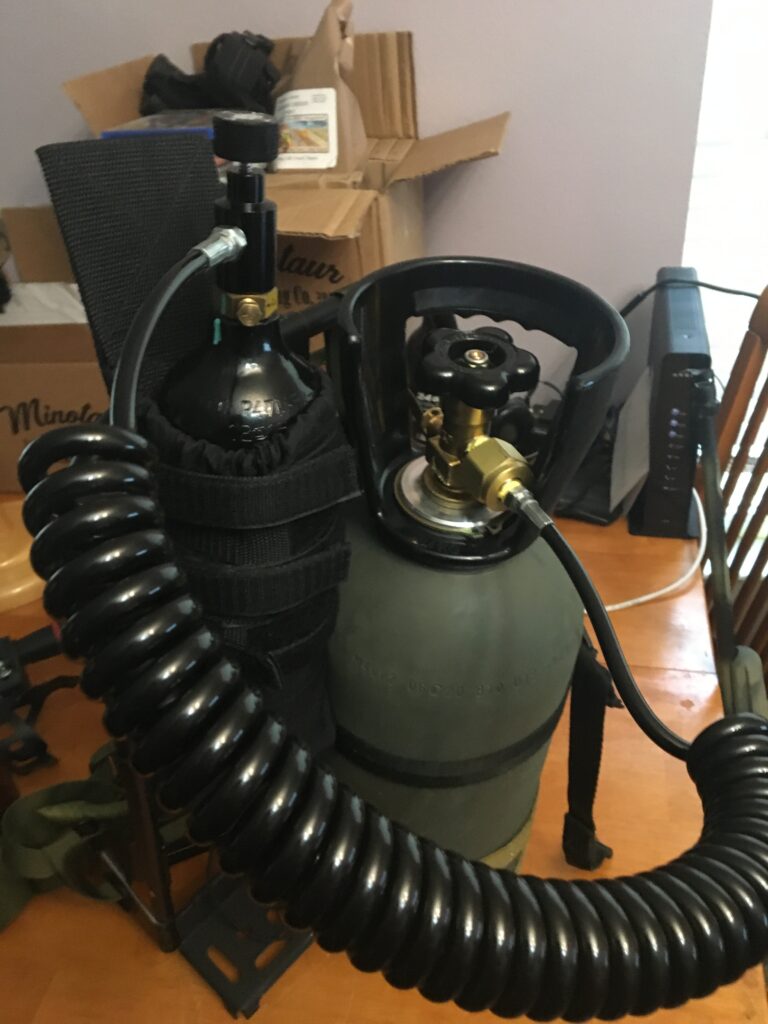
As I said, YMMV.
Hope you all enjoyed.
Like I said, I know nuzzin’!!!
More Later
Big Country


You’re so helpful!😊
This post needs to be downloaded, archived, stored, shared and made as widely available as possible. This type of information is priceless. And it’s the type of information the criminals in power want buried deep.
+100
PDF this shit.
Not, of course, that I’d ever endeavor to assemble such an eeeeeeevil and unnecessary device here in the Glorious People’s Paradise of Califrutopia.
Purely for informational purposes, I note that AZ and NV are a short 3-4 hr drive away, and land there is cheap.
I repeat, PDF this.
Please.
And then hot-link it over on one of the sidebars.
Monetizing the link with ads and such might pay for your retirement, before they figure it out. 😉
And now, a word from our sponsor:
https://www.youtube.com/watch?v=V4nknAzQPHE
Converted to pdf and uploaded to my Proton drive, feel free to download: https://drive.proton.me/urls/W85XTKXME8#ArTs1fSEEjcX
Appreciate it Arthur!
The original poast took 7 days to do, and then about 12 hours (last night/today) to put it together. Got quite a large amount of time put into it. Glad I can help!
Awesome!
You, sir, are truly awesome.
Kudos.
I will have to send this to my brother. he still lives in philly (??) and thus will work a lot better than any shotgun would on crowd control. knowing him though, he going to try to make it a 2 tank model. like maybe add a pressure gauge and regulator to get it to 250 psi like the old WW2 ones. figure one from a welding setup would work I guess. I think I have one or two around here
somewhere.
there are way too many trees and bushes around here for me to even think about making and using one myself. still going to print this off and save in a hard copy and might even start to get the parts needed for it. we see.
Wammenflerfer! Flerfenwammer, Wermenflaffer, Flaffenwermer, But, but, my f3dpoast? (/s)
Just in time as Klaus bought up all the governments to make them beyond vile and worthless so that the people have to revolt out of survival necessity before they get everyone killed.
I’m at that F’ it point myself and as George Carlin said in an audio book…the fact that flamethrowers exist means at some point someone said I would like to set those people over on there on fire but I am too far away. (paraphrase)
We’ll see how committed the comrades are to burn it all down when they catch some to the face.
Where did that wet spot on this couch come from? And WHY do I feel the need for a cigarette…and some cuddle time?
Thanks, Big Country! I do believe that all of these pieces and parts are available at my locally owned hardware store. I’ll know for sure in the next day or so.
Mongo,
Your design will save a lot of $
This would cost over 3 grand if you bought it off the shelf
https://throwflame.com/products/xl18-flamethrower/?avad=230949_f36d20599
That’s hilarious! Napalm compatible to boot & in my favorite color, olive drab. I’ve been told, when preparing for the coming shit show, splurge!
Style, you got STYLE!
Let the bois chow on a cockmeat sammich while enjoying the video.
I especially like the Cloud of Black Smoke. A tribute to Green Energy amd Teresa Heinz‘s Bitch.
When cutting thread you do not want the long continuous curl of metal like you do in drilling. For thread cutting, after you get the tap started, go Forward one half turn and backwards one quarter. This will break the chip size down and give you smother threads
I have heard that there are two things humans will instinctively not run towards: bayonets and fire (some firefighters may disagree, maybe they are different). That flame machine has some very practical uses, such as clearing weeds from fence lines and drainage ditches, feel free to use this alibi when Barney Fife comes knocking.
Looks like it would be good for well established fire ant mounds.
And, I’ll bet all those Karens around the lake called the HOA pretty fast.
———
The last time I played with pressurized gas and flames coming out of a pipe was a pretty lame build of a Goddard type rocket when I was in the early teens. It didn’t go well. I still prefer the throwy splody things or the remotely triggered splody things that I moved on to after that.
Blessings Brother, or Inflightsalad snackbar as the mooj say?
Question for the modders – the 20lb tank, is… just a tank, right? A vessel, or container. Like, if I had access to an old scuba-diving tank, or an old fire-extinguisher (hell, a friggin propane bottle), that would ‘work’, too? You’re just looking for an inert (non-reactive metal) container you can pressurize and tap/drill, right?
Gotta size the propellant CO2 tank to match the volume of the fuel-holding one, but… One of those double-tank scuba rigs would offer quite a bit of werfing in one reload and go, no?
I’m just spitballing, but you probably want to make sure whatever vessel you choose to use was recently pressure-tested to full spec.
A blow-out while fully fueled could be a Red Adair moment, until the screaming stopped.
Thanks for the interesting read. Looks like one could use an SCBA rig for the main bottle and a way to carry it comfortably.
I have one of these. They are well built & have electronic ignition so no need for standing flame……Plus they’re on clearance for $350.
https://palmettostatearmory.com/exothermic-technologies-pulsefire-ubf-underbarrel-flamethrower-black-pf-ubf.html
Wouldn’t be surprised if there’s be a few burn wards out there whose staff will be putting in some overtime, only on account of the odds being people try this, fuck it up, and barbecue themselves.
Chalk it up to ‘natural selection’.
Word. It looks good on paper, however mechanically challenged geezers like me would have a hard time putting this device together. Since my personal focus is on home defense, I have studied the avenues of approach and lines of drift in my A/O. I will be forced to rely on Dragon’s Breath, Tannerite, and other assorted area denial devices.
For those of you ladies and gentlemen who are adept and focused enough to put together and successfully operated this device, congratulations. One other point, if I may: The operator better be aware of tactics. One burst, and all the focus will be on him/her to stop another burst. You better be ready to break for cover. I speak from my 11B20 training and OCS indoctrination in 1970. I actually saw the Army issue flamethrower demonstrated at Benning. Personally, I would rather carry my M-79. Bleib ubrig.
Dammit man. I thought I had outgrown my pyro faze brought on by my father being a fuel tanker driver who regularly made trips to Bama and railyards keeping me in ample supply of racing gas, m-80’s, aasnd railroad flares growing up. Then model rocket club. Then being a U.S.N. gunners mate.
So I can appreciate the epic bad assery in engineering and building this. I can appreciate the level of destruction and death this can dish out. I can appreciate the mental anguish and fear this can instill.
You are a madman and a genius. I raise a shot of woodford reserve to you.
Ya know, if these could be remotely operated…and they easily can…about 4 of these placed at strategic locations in hardened hidden containers around my 40 acres would lock this mfer down tight. Talk about area denial. My rear is an 8 acre swamp, right flank is an 8 acre lake. Left flank is a hardwood creek bottom with 2 passes. One road in with a bridge crossing.
Someone would have to have air power and even then….Man.
Local sheriff dept.already knows I’m crazy. I mean hell I got a sign at the gate that says “All welcome, thieves, pedos and feds(But I digress) get the woodchipper.” And “You are on camera and in range. Message brought to you by 7.62×54″.
Would be great to add one that says”Warning: Remote control flamenwerfers”.
Dude. I dont live that far from you. Im 15 mins west of 6 flags over Ga. I got 40 wooded acres, and some badass bass fishing. Some badass dirt bike/side by side trails. And being Im known and near a rock quarry no one bats an eye if they hear something blow up. It would be an honor to have you and family stop by. Anytime.
Sorry for the blog.
Fiddlin John Carson
Mr. Carson:
Would that put you east or west of the 85/20 intersection? I’m 3 hours south on 85 in AL. Be nice to have a Big Country meet up.
Spin
I bought an Exotherm at PSA—-besides the fun of burning zombies,there are lots of uses around the homestead….and a plus-the wife builds a fire in firepit-pyschoman starts it-every night..
You know….for home defense…maybe you could position a couple of these in expedient locations rigged to be activated remotely…in Minecraft.
Around here the porkies are wearing the new UHMWPE (polymer) rifle plates that make them look puffed up like cartoon characters. I’ve often wondered how those things would burn. There is a lot of fuel in an inch and a half of plastic.
Also often wondered why deputies in such a rural county would need the latest and greatest body armor like that. Oh, yeah, attack dogs in most of the black SUVs they drive too.
I could achieve the same effect by lighting my own farts. Bigger blast radius too…
😂👍
How does one get on the list, if he has money to spend and isn’t mechanically inclined?
Asking for a friend.
Now on to special sauce for the barbecue